Take your e-commerce store further.
Using the right Magento 2 extension is more essential now than ever. With MagePal, you can rest assured that you are getting the best quality Magento extensions, each line of code are carefully crafted and rigorously tested. Spend less time debugging and more time doing what you do best with MagePal extensions!
Google Analytics 4 for Google Tag Manager
What is Google Analytics 4?
Google Analytics 4 is an innovative upgrade to the Google Analytics Platform. With Advanced Features that let you take your business data to the next level. It boasts highly advanced analytics tools with advanced machine learning technology, Ultra-fast Performance, and a new approach to privacy-first tracking. GA4 provides the right data and insights across all touch points and channels. You’ll be able to visualize user performance on any device in one dashboard, improve application reach, and segment reports in real-time.
Adding Facebook Pixel, Bing UET, or other third-party JavaScript to your site using Google Tag Manager? Learn how simple and easy it is to integrate any third party service with our new DataLayer extension.
Installation Guide
Step 1
Review license.txt
Step 2
Install Google Analytics 4 for Google Tag Manager (version 2.0.0 or greater for Magento 2.4.0 and above)
Using Composer (recommended)
- Please log in to your MagePal account for information on how to access our private composer server.
composer require magepal/magento2-google-analytics4
Manually (not recommended)
- Download and install our core extension
- https://github.com/magepal/magento2-core
- Install Google Tag Manager (version 3.0.0 or greater for Magento 2.4.0 and above)
Using Composer (recommended)
composer require magepal/magento2-googletagmanager
Using Hyvä Magento 2 Theme?
- Installing the compatibility extension is necessary if you are using Hyvä Magento 2 Theme.
composer require hyva-themes/magento2-magepal-google-analytics4
Learn more about installing and setting up Google Tag Manager
Download Google Analytics 4 extension
- Download the extension
- Unzip the file
- Create a folder {Magento 2 root}/app/code/MagePal/GoogleAnalytics4
- Copy the content from the unzip folder
Step 3
Enable Module (from {Magento root} folder)
 php -f bin/magento module:enable --clear-static-content MagePal_GoogleTagManager
 php -f bin/magento module:enable --clear-static-content MagePal_GoogleAnalytics4
 php -f bin/magento setup:upgrade
Configure Google Analytics 4 for Google Tag Manager
Step 4 - Configure Google Tag Manager Extension Setting
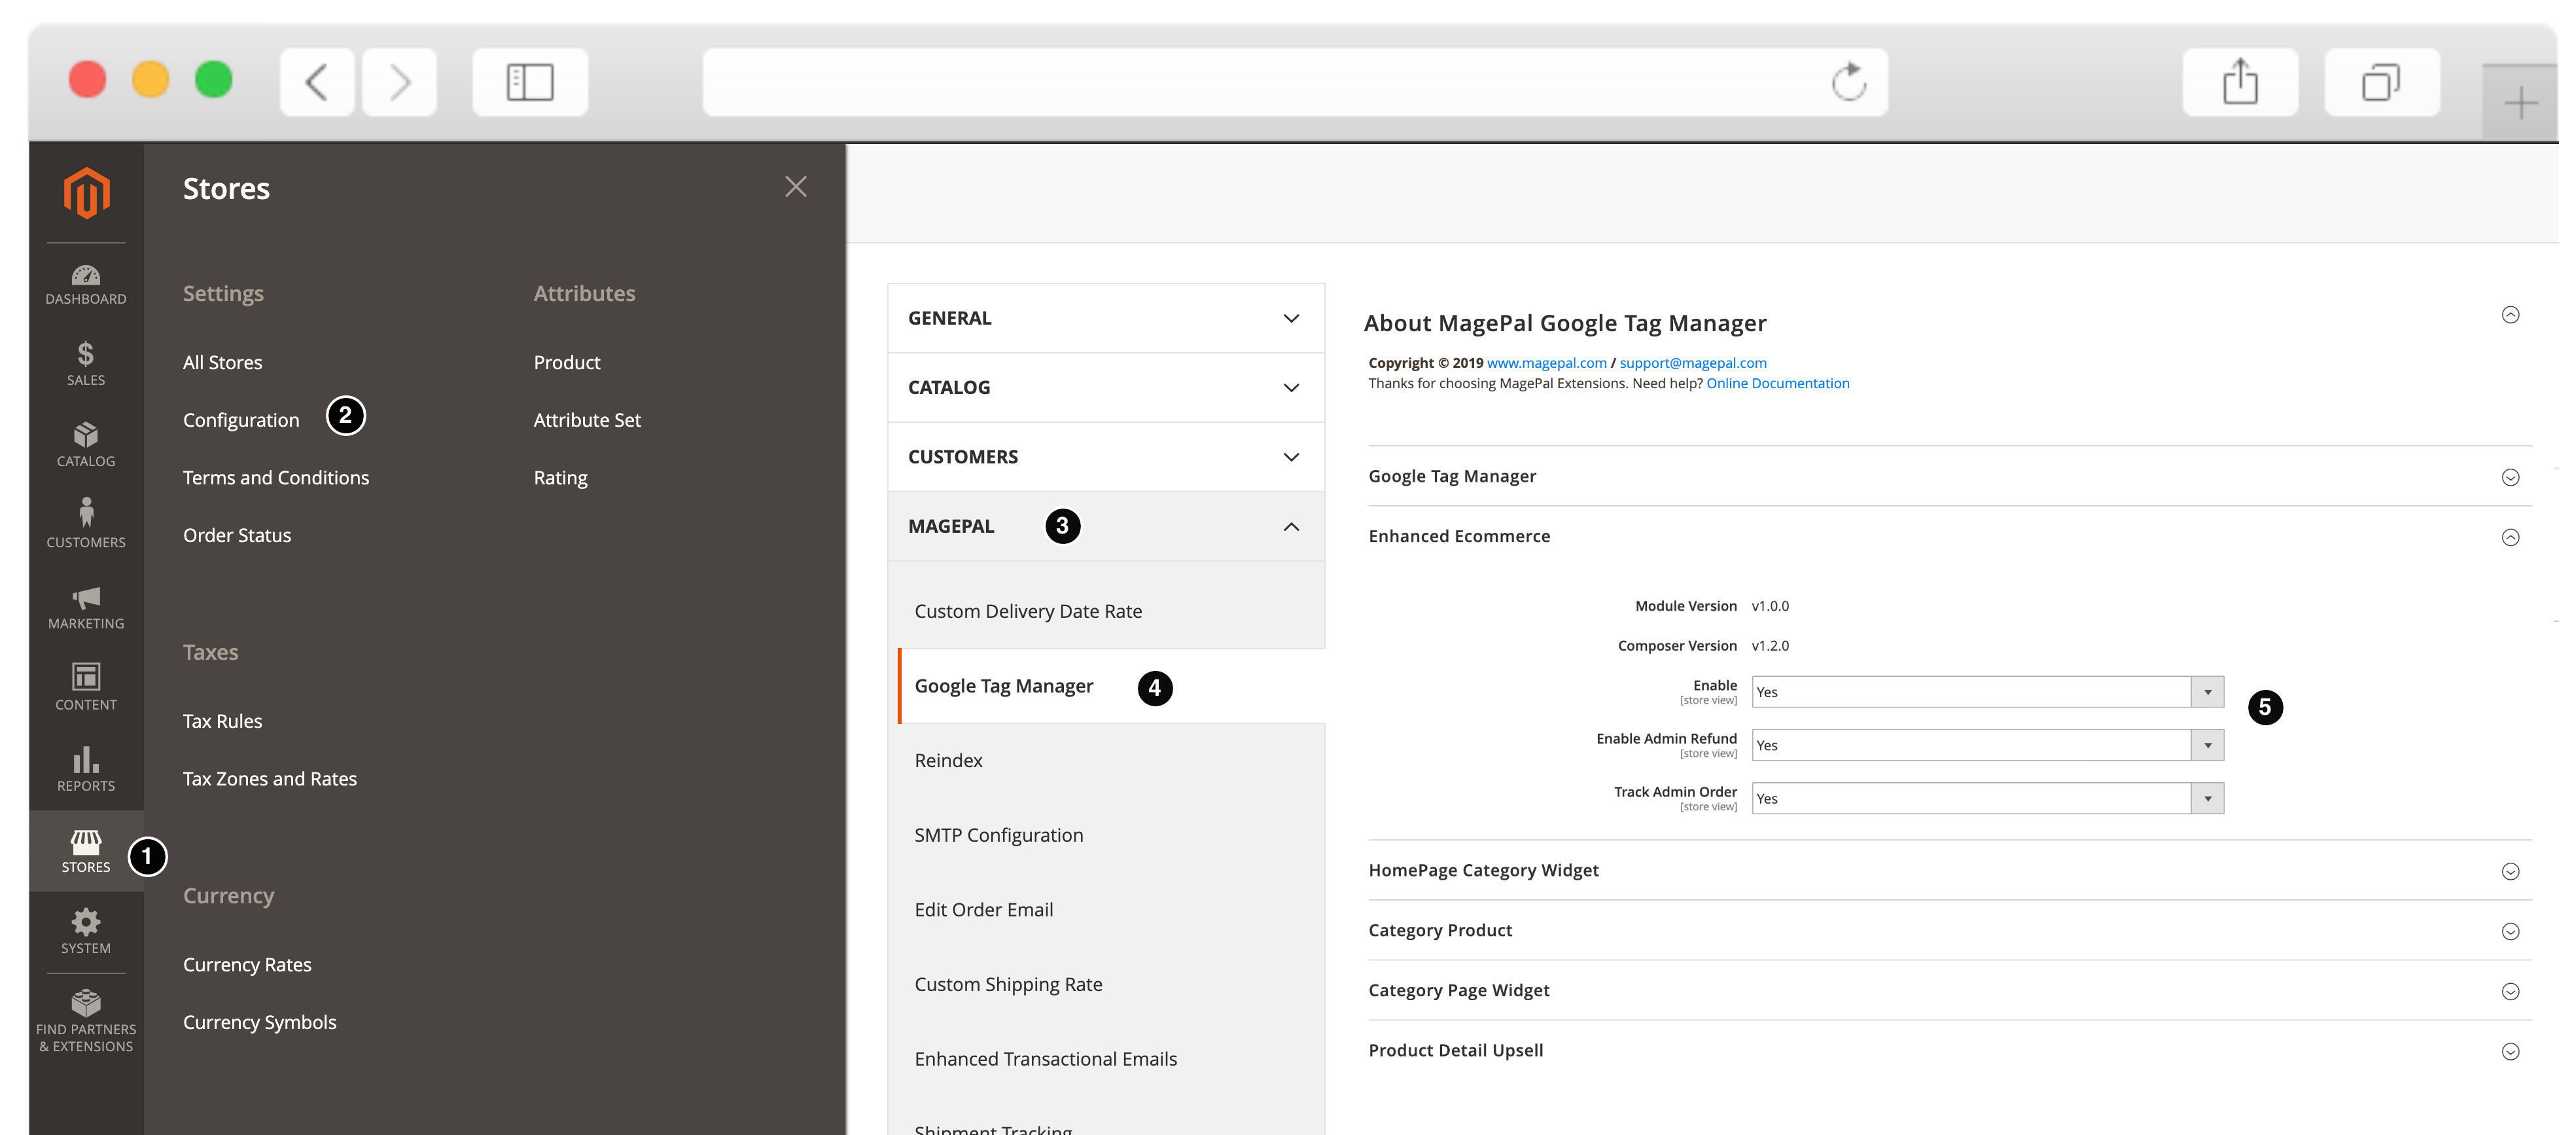
Log into your Magento 2 Admin
- Goto Stores
- Configuration
- MagePal
- Google Tag Manager
- Enable Google Analytics 4
Step 5 - Extension Review
Like our extensions? Would you be kind enough to leave us a Google review? It only takes a minute and we’d be eternally grateful! Just click the link to go to our MagePal Google Business page and leave us your feedback.
Google Tag Manager Account Setting & Configuration
The quickest way to configure your Google Tag Manager Container is to use our auto import JSON config import file for Google Tag Manager. Our configuration (.json) file is used to simplify the process, importing to generate a tag in your GTM container. For additional information, see Google’s Container export and import which provide walk-through on how to importing a sample JSON file to a new container.
Google Tag Manager Configuration Instructions
Google Tag Manager GA4 Container JSON Import
Data Layer Customization | API
Add more information to the data layer to meet your client needs is as simple as adding few lines of php and di.xml code in your custom extension.
Order Data Layer Customizing
namespace MagePal\GoogleTagManagerAddons\DataLayer\OrderData;

/**
 * Class OrderProvider
 * @package MagePal\GoogleTagManager\DataLayer
 * @method getItem()
 * @method getOrder()
 * @method getListType()
 */
class OrderProvider extends MagePal\GoogleTagManager\DataLayer\OrderData\OrderAbstract
{
    /**
     * @return array
     */
    public function getData()
    {
        $data =  [
            'tax' => $this->getOrder()->getTax()
        ];

        return $data;
    }
}
di.xml
<?xml version="1.0"?>
<config xmlns:xsi="http://www.w3.org/2001/XMLSchema-instance"
        xsi:noNamespaceSchemaLocation="urn:magento:framework:ObjectManager/etc/config.xsd">
    <type name="MagePal\GoogleTagManager\DataLayer\OrderData\OrderItemProvider">
        <arguments>
            <argument name="orderItemProviders" xsi:type="array">
                <item name="order-item-provider-brand" xsi:type="object">MagePal\GoogleTagManagerAddons\DataLayer\OrderData\OrderProvider</item>
            </argument>
        </arguments>
    </type>
</config>
Learn more about customizing our Google Tag Manager extension
jQuery Events | API
$("body").on("mpCustomerSession", function (event, type, products, datalayer) {

});
/*
 * @type AddToCart | RemoveFromCart
 */
$("body").on("mpCartItem", function (event, type, products) {

});
$("body").on("mpCheckout", function (event, index, title, code, products) {

});
$("body").on("mpCheckoutOption", function (event, step, checkoutOption) {

});
$("body").on("mpGa4ProductClick", function (event, product, list) {

});
$("body").on("mpGa4CheckoutShippingStepValidation", function (event, isFormValid, errors) {

});
$("body").on("mpGa4CheckoutPaymentStepValidation", function (event, data) {
    data.isValid (bool)
    data.errorMsg (array)
});
$("body").on("mpGa4CheckoutEmailValidation", function (event, emailExist) {

});
Data layer attributes
In addition to all the standard data elements provided by our Google Tag Manager extension, our Google Analytics 4 extension include additional data layer element.
Google Analytics 4 Data Layer
Product Page
- Trigger: event equals view_item
- ecommerce.currency
- ecommerce.items[].item_id
- ecommerce.items[].item_name
- ecommerce.items[].category
- ecommerce.items[].price
Category Page / Product Impression
- Trigger: event equals view_item_list
- ecommerce.items[].name
- ecommerce.items[].id
- ecommerce.items[].price
- ecommerce.items[].list
- ecommerce.items[].position
- ecommerce.items[].category
- ecommerce.items[].category2
- ecommerce.items[].category3
- ecommerce.items[].category4
Product Click
- Trigger: event equals select_item
- ecommerce.click.actionField.list
- ecommerce.items[].id
- ecommerce.items[].name
- ecommerce.items[].category
- ecommerce.items[].category2
- ecommerce.items[].category3
- ecommerce.items[].category4
- ecommerce.items[].price
Add to Cart
- Trigger: event equals add_to_cart
- ecommerce.items[].id
- ecommerce.items[].name
- ecommerce.items[].price
- ecommerce.items[].quantity
- ecommerce.items[].parent_sku
- ecommerce.items[].variant
- ecommerce.items[].category
- ecommerce.items[].category2
- ecommerce.items[].category3
- ecommerce.items[].category4
Remove from Cart
- Trigger: event equals remove_from_cart
- ecommerce.items[].item_id
- ecommerce.items[].item_name
- ecommerce.items[].price
- ecommerce.items[].quantity
- ecommerce.items[].variant
- ecommerce.items[].category
- ecommerce.items[].category2
- ecommerce.items[].category3
- ecommerce.items[].category4
One Page Checkout Custom Events
Customer Add Valid Email Address
- Trigger: event equals checkoutEmailValidation
- checkout.email_exist
Checkout Shipping Step Completed
- Trigger: event equals checkoutShippingStepCompleted
- see Shipping Method Added
Checkout Shipping Step Validation Failed
- Trigger: event equals checkoutShippingStepFailed
- checkout.shipping_errors[]
Checkout Payment Step Completed
- Trigger: event equals checkoutPaymentStepCompleted
- see Shipping Method Added
Checkout Payment Step Validation Failed
- Trigger: event equals checkoutPaymentStepFailed
- checkout.payment_errors[]
Checkout Shipping Method Added
- Trigger: event equals shippingMethodAdded
- checkout.shipping_method.title
- checkout.shipping_method.amount
- checkout.shipping_method.carrier_code
- checkout.shipping_method.carrier_title
- checkout.shipping_method.method_code
- checkout.shipping_method.method_title
- checkout.shipping_method.price_excl_tax
- checkout.shipping_method.price_incl_tax
Checkout Payment Method Added
- Trigger: event equals paymentMethodAdded
- checkout.payment_method.title
Global Data Layer
- Trigger: event equals addToCart
- cart.add.products[].id
- cart.add.products[].name
- cart.add.products[].price
- cart.add.products[].quantity
- ecommerce.add.products[].parent_sku
- cart.add.products[].variant
- cart.add.products[].category
- Trigger: event equals removeFromCart
- cart.remove.products[].id
- cart.remove.products[].name
- cart.remove.products[].price
- cart.remove.products[].quantity
- ecommerce.add.products[].parent_sku
- cart.remove.products[].variant
- cart.remove.products[].category
Debugging Google Analytics 4 for Google Tag Manager
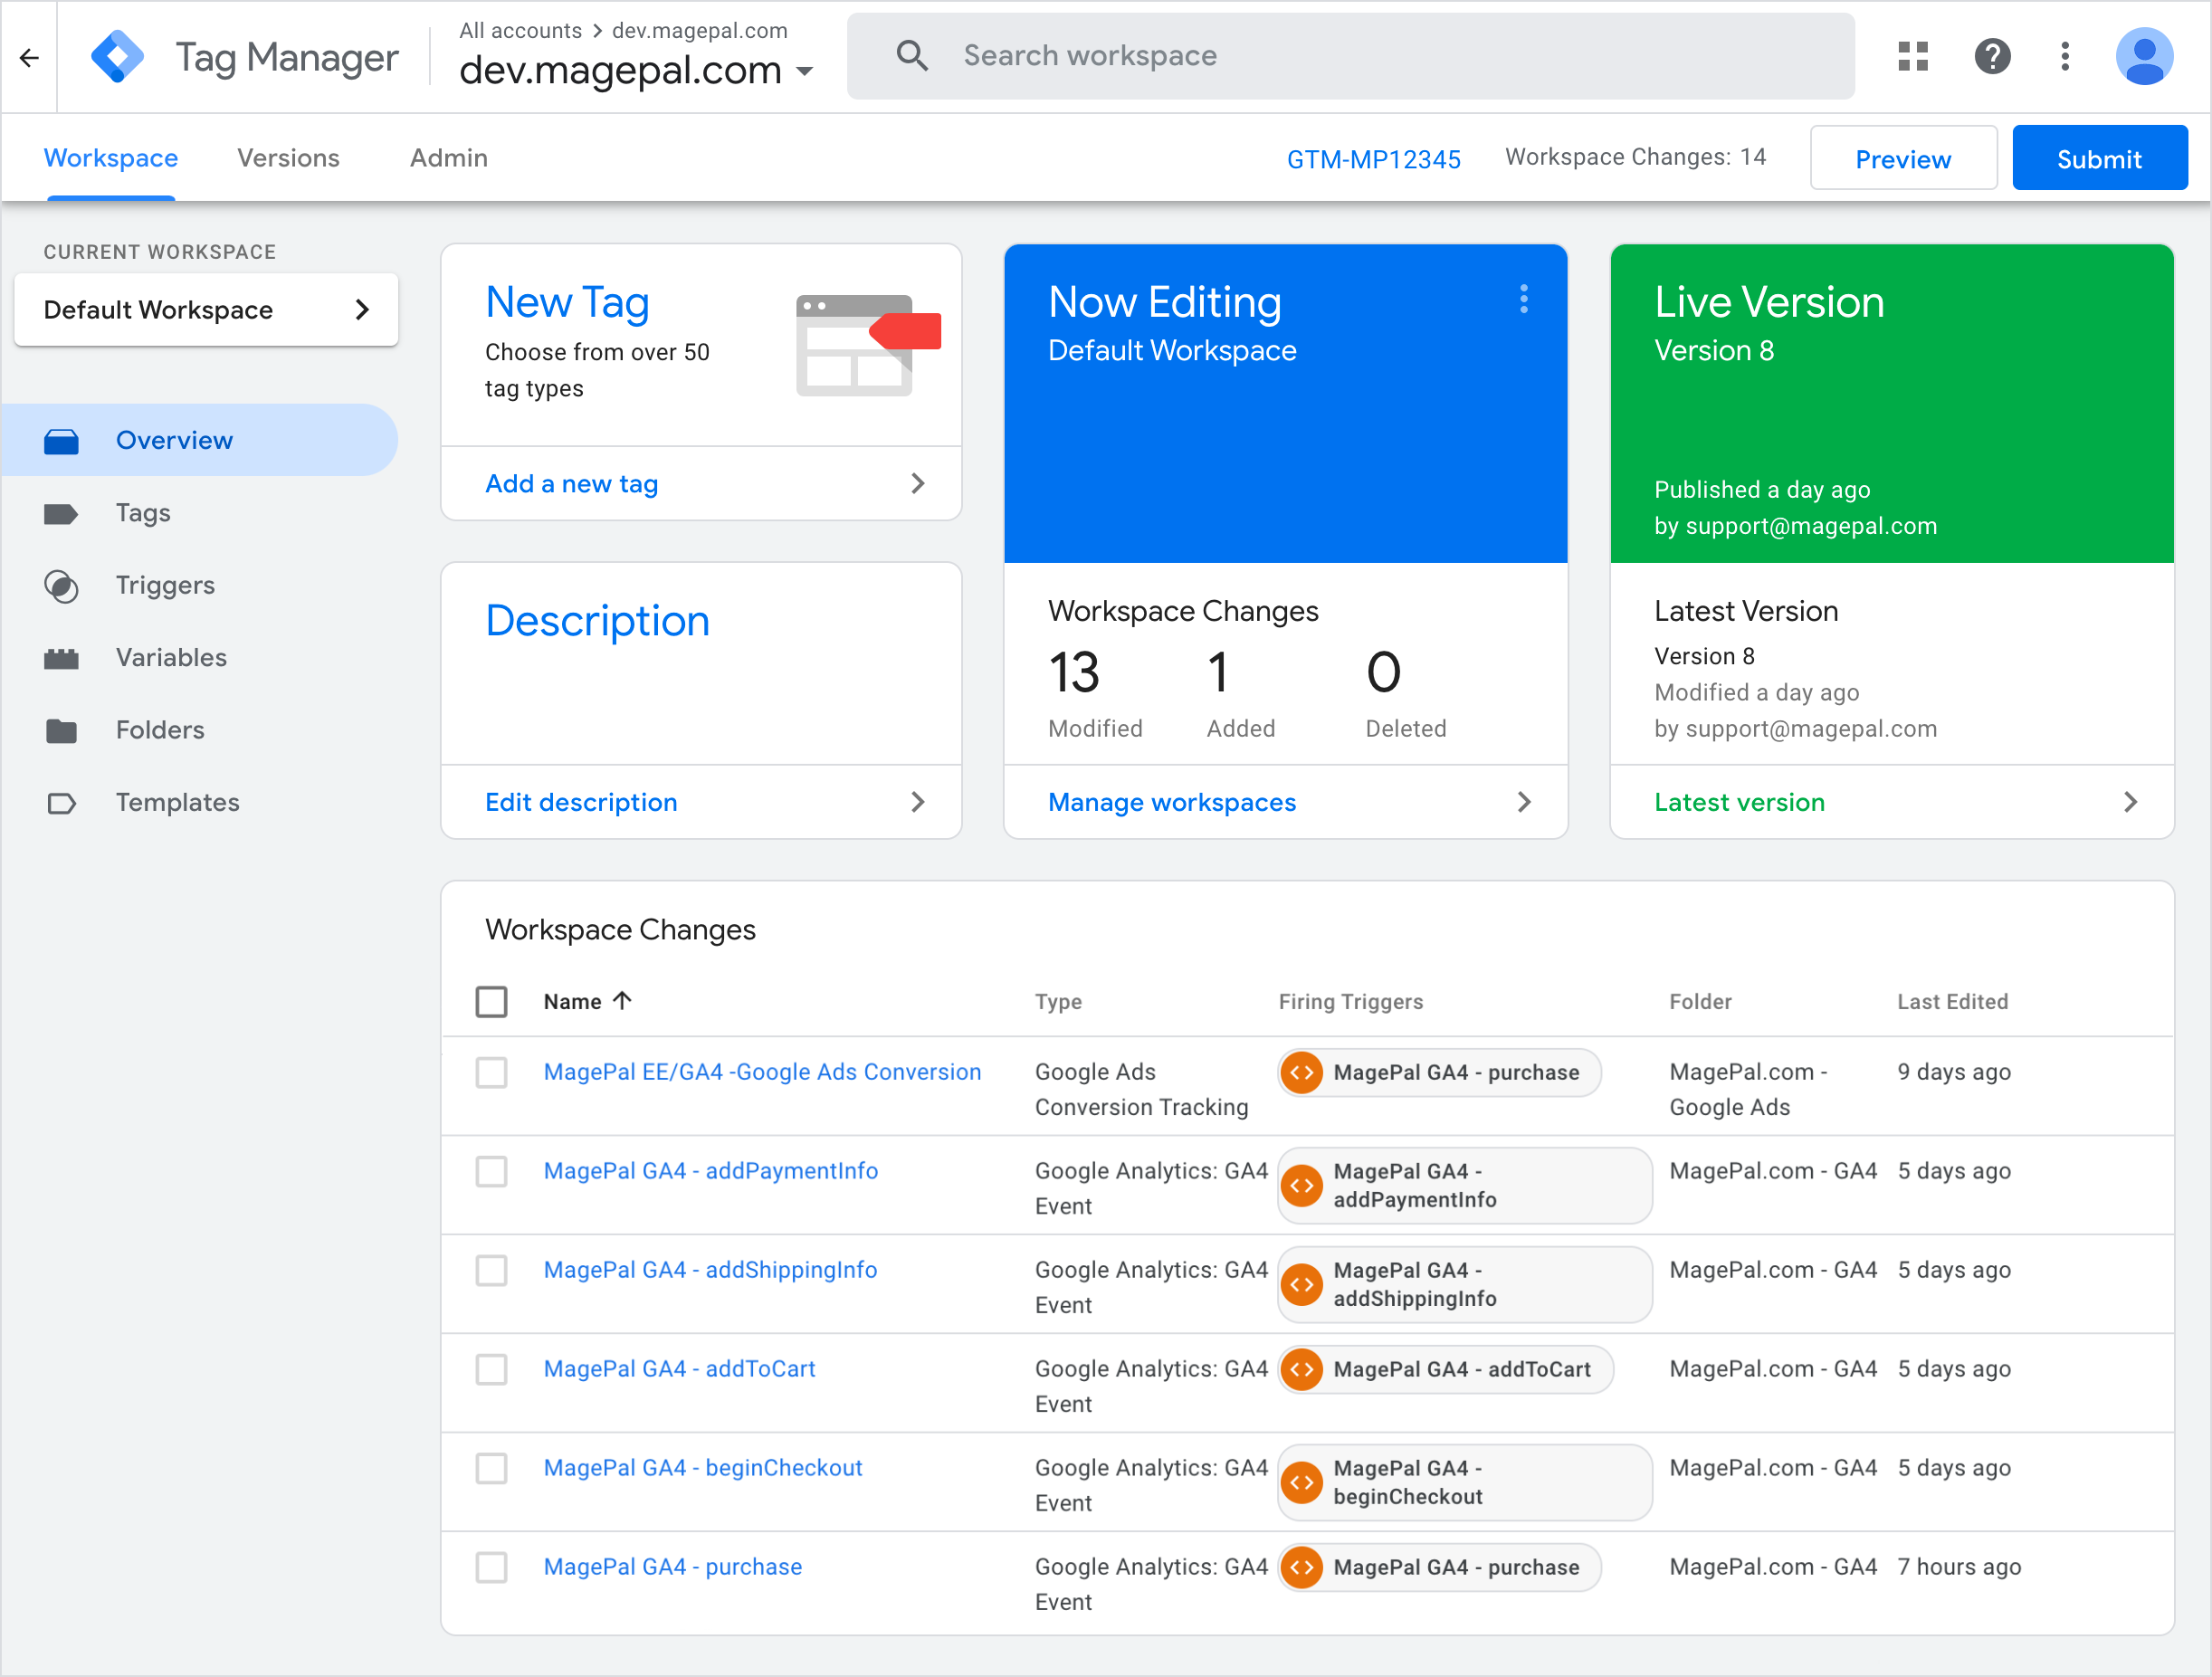
Even the most advanced Google Tag Manager users often run into issues while setting up new tags. Frustrated by the process we often ask ourselves, why doesn’t my tag fire, what data is sending to Google Analytics and why didn’t this trigger work?
One of the most overlooked, yet important steps while working with GTM is its preview and debugging mode. Google Tag Manager’s preview mode allows you to preview your container code as if the current container draft was deployed so that you can test your configuration before it is published.
For general debugging information see how to debug Google Tag Manager
How to debug productClick event not triggering
Unlike other Enhanced Ecommerce extensions that add hundreds of lines of JavaScript to your site, our extension was designed to minimize the amount of code injected in your site. Our extension was design to use Magento HTML and CSS classname to function correctly. In rear situation third party themes, extensions or developers my change the default Magento structure which cause our extension to not fire all events. Fixing this is as simple as remapping your site HTML structure in our extension.
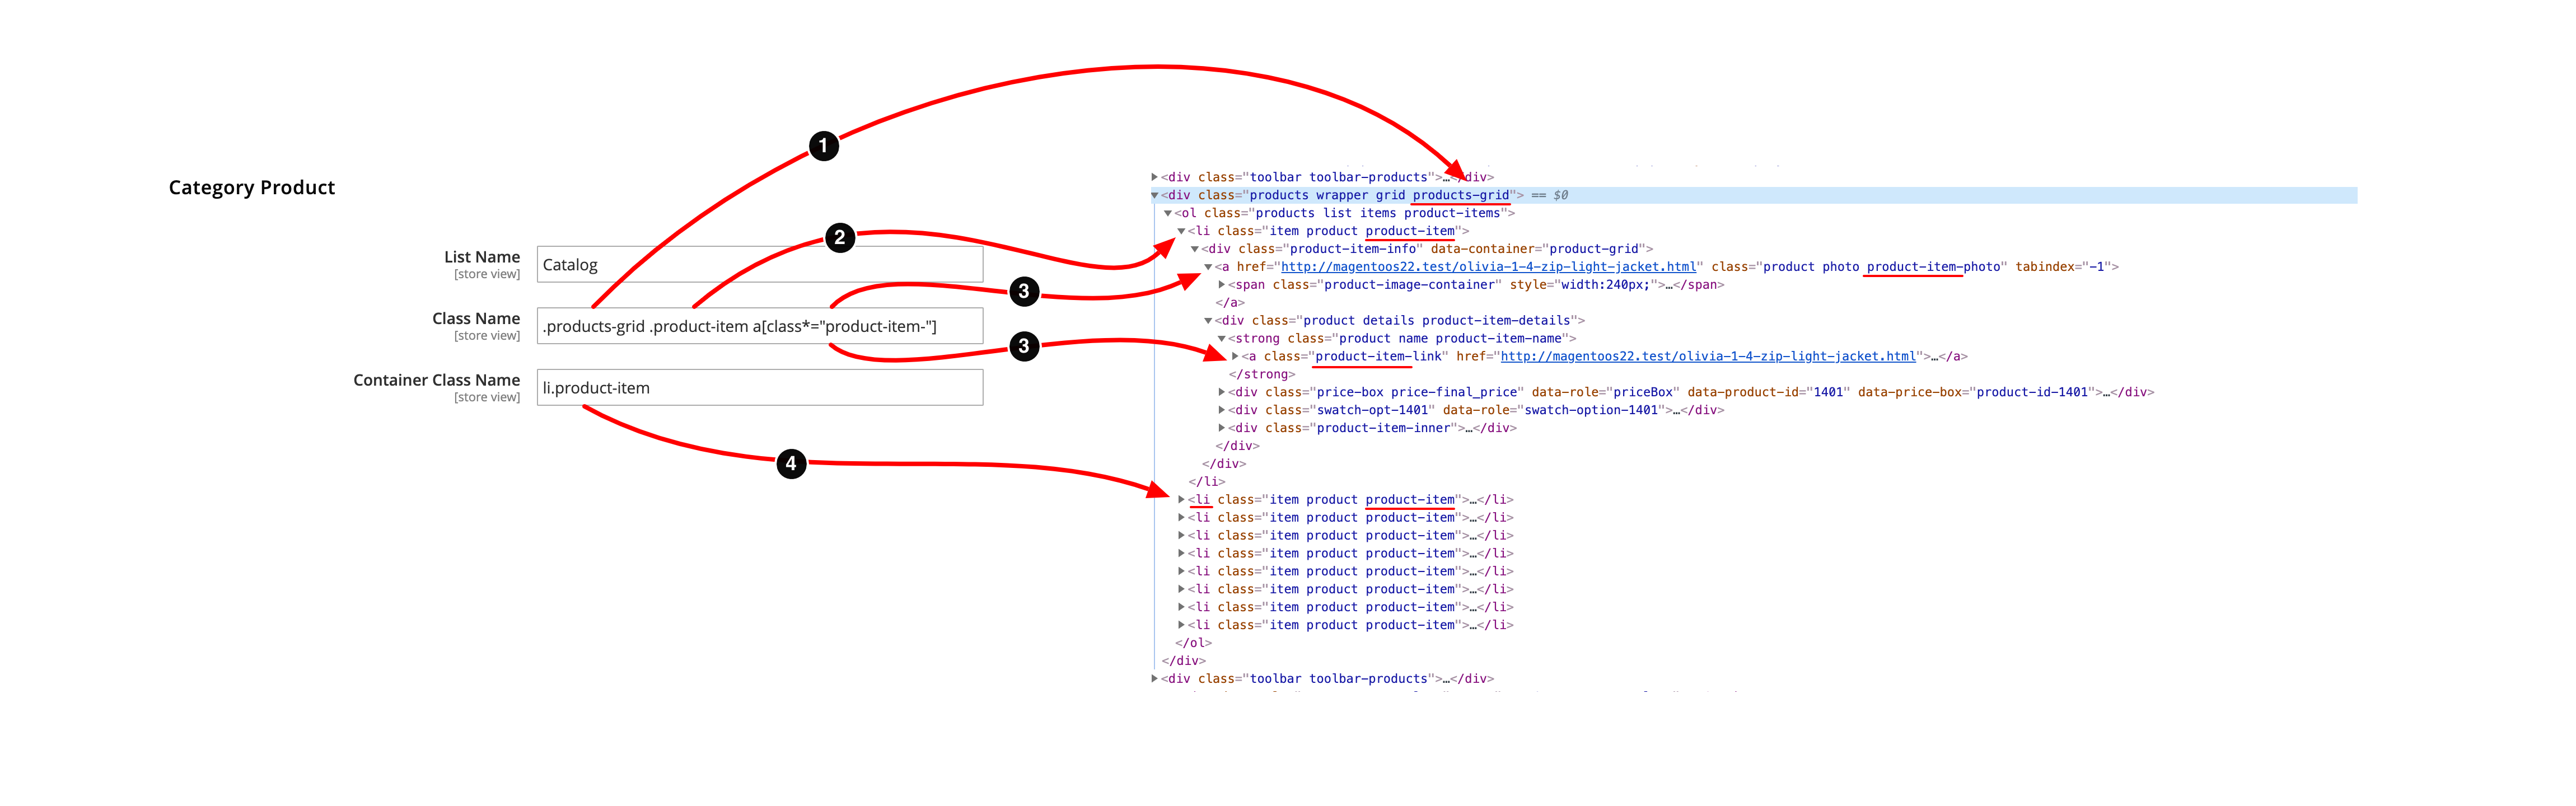
In Chrome or any other browser, go to your Elements tabs and find the item collection elements.
Class Name | Selector
- #1 Should map to the outer wrapper or parent element of your items collection
- #2 Should map to the individual product element parent container
- #3 Should map to each hyperlink that when click on take you to the product detail page
Container Class Name | Selector
- #4 Should map to the individual product element parent container. eg
liordiv
You can quickly test your selector you run the code below in your browser’s console.
//should return each product link
jQuery('.products-grid .product-item a[class*="product-item-"]')

//should return the parent container for each item
jQuery('.products-grid .product-item')
Version History | Change Log
2.0.0
-
New Features:
- Content Security Policy (CSP) Support: Added support for CSP to enhance security for Magento 2.4.7.
- Version Support Changes: Discontinued support for Magento versions 2.0.x, 2.1.x, 2.2.x, and 2.3.x.
- Current Version Compatibility: Fully compatible with Magento 2.4.0 and above.
1.7.1
-
New Features:
- none
-
Fixed bugs:
- Enhancement - Moved purchase data elements location to match Google’s GA4 documentation (move data element from ‘ecommerce.purchase.’ to ‘ecommerce.’)
- Add GTM tags for order refund
- Fix issue with Amasty Ajax to Cart
- Fix GA4 add to cart issue when use in combine with our Google Enhanced Ecommerce
1.7.0
-
New Features:
- Add support for Enhanced Ecommerce & GA4 to work side by side
- Add Related, Upsell, cross Sell to Admin config
-
Fixed bugs:
- Fix issue with Product Detail list element
- Fix issue with Product Detail position element
1.6.0
-
New Features:
- Fix issue capturing the correct product category and position on product detail page
- Fix add/update/remove product qty for Aheadworks OneStepCheckout mini checkout side cart
- Add support (partial) for Aheadworks OneStepCheckout
- Fix wrong url generated for add cart tracking url tracking
- Fix issue with add to cart with PayPal on product detail page in Magento 2.3.5
- Add new add to cart events (Missing options and item out of stock events)
- Add new option for category product impression list type
- Add currency code to product data push event to better support currency conversion
- Add Wishlist product impression
- Add Compare product impression
- Add new admin option for category product impression list name
- Add limited support for Amasty One Step Checkout
- paymentMethodAdded not triggering on some payment method
- Add support for Amasty Ajax to Cart
- Add checkout events
- checkoutShippingStepCompleted
- checkoutShippingStepFailed
- checkoutPaymentStepCompleted
- checkoutPaymentStepFailed
- shippingMethodAdded
- paymentMethodAdded
- checkoutEmailValidation
- Add Javascript Trigger
- mpCheckoutShippingStepValidation
- mpCheckoutPaymentStepValidation
- Fix “class does not exist” when saving admin order
- Update checkout steps logic to prevent duplicate events
- Add product variant
- Add product category (auto select first category)
- Api to quickly add more content to the data layer (see base GTM for more information)
- Add jQuery trigger event for mpCustomerSession, mpCartItem, mpCheckout and mpCheckoutOption
- Add data list to product detail page
- Edit add to cart item on product detail page
- Support for Enhanced Success Page
- Add currency code to product data layer
Related Extensions
Get more from your Magento2 store!

DataLayer for Tag Manager
Whether you are integrating Bing, Facebook, SnapChat, Pinterest, or any other services our extension make it easy.
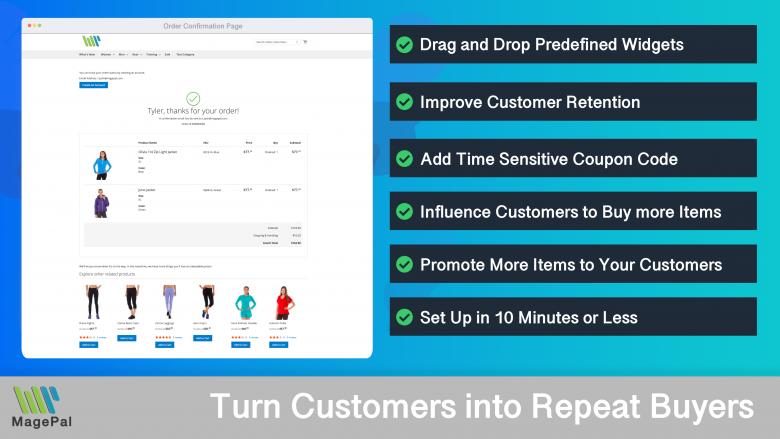
Enhanced Success Page
Add cross-sell, upsell, related products, social media links and other elements to your order confirmation.
Order Shipment Tracking
Providing your customer with a beautiful and functional order package tracking without leaving your site.
0
Total Downloads
11
years experience with Magento
30+
Magento / Adobe Commerce Extensions
Shop with confidence
With millions of downloads worldwide, install with confidence knowing that our extensions will just work.
Prepare for the future with Google Analytics 4
Is your Magento store ready for the future? Say hello to the new Google Analytics 4, which is built from the ground up with all-new features and advanced machine learning technology.